| << Previous | Download PDF of whole scan instructions | Next >> |
After Scanning...
- Back Up Your Data
- Create a link in your project directory
- Session directory structure
- Copy Over Stimulus Files
- Input and Upload Session information
Back Up Your Data
This is of course the first thing you should always do.
Kalanit asks only that you copy the P*.7 files from your scan, but it's probably a good idea to copy the P*.7.mag files too, as data CDs do sometimes fail if they're stored too long, and extra backup is helpful. It might sometimes help to copy over your stimulus code first, but do not forget to burn CDs or DVDs of the MRI data files.
Create a link in your project directory
- Logon to a linux machine (e.g., moach, white, eynaim)
- Windows machines: use an SSH program like putty.
- Mac OSX: Open a Terminal window; type 'ssh moach -l [myaccount]'.
- Linux: You're there.
- cd /biac1/kgs/projects/
- If this is the first session of a new project, create a new directory for that
project.
For instance, we'll use a sample session from a study on distance representation, 10/06/03 js: we'll make a distance project directory:
[sayres@moach projects]> mkdir distance
and cd into the directory for that project:
[sayres@moach projects]> cd distance
Note also I can nest these, so if this session is a 'track hybrid' experiment within the distance experiment, I could also make:
[sayres@moach distance]> mkdir trackhybird
[sayres@moach distance]> cd trackhybrid - At the same time as making the project directory, you'll also want to input some information about your project by going to this web page and filling in the fields (ask Rory if you have any questions).
- Check that the project is in the /biac1/kgs/mri/ directory after the scan:
[sayres@moach trackhybrid]>ls /biac1/kgs/mri/
Look for the directory entry, e.g. '031006js'. - Make a link to the mri directory in your projects directory:
[sayres@moach trackhybrid]>ln -s /biac1/kgs/mri/031006js/ js031006
(Note that I named this link by subject--js031006--because I like it that way; you can actually name your link however you like)
A typical session directory
Since there are several things that might be in a given MRI session directory, it
can be helpful to have an illustration. Here are the things the setup code will look
for or generate:

Copy over stimulus files (optional)
This is a helpful thing to do for a few reasons. One, it lets you have a copy of whatever stimuli you used on that particular session. So if you update your stimulus code or scripts, you don't lose track of those changes. Two, if the stim directory is set up a certain way, setup scripts can automatically upload all your stimulus information onto the database, making it easier for anyone to e.g. get or make .prt files of a given stimulus/scan. Also, it's helpful to have any behavioral data you collect right by the MRI data.
From your display computer, upload your matlab or other stimulus files to the RAID.
Make a directory within your session directory named 'stim':
[sayres@moach js031006]> mkdir stim
Then upload your data from the stimulus computer to the stim directory. On a MacOS 9 Mac, you can use NiftyTelnet SSH and use the 'SCP' option to do this.
Input and Upload Session information
First, you'll need...
- A machine with access to the RAID
- A copy of MATLAB 6.5 or greater on your machine
- The username (vista) and password (ask Rory or Bob Dougherty) to get on to the mrData web page
Windows machines
Before you begin, you'll also need to copy a system file to your machine so that
it can automatically access the online database. The file is located at:
/biac1/kgs/dataTools/VISTASOFT/mrData/libMysql.dll
and you need to copy it to:
C:\WINNT\system32\ or C:\WINDOWS\system32
(depending on your version of windows, and assuming C:\ is your main partition.) Contact Rory if this is at all unclear.
Okay, we're almost done ...
- Open MATLAB
- cd to where you have the RAID located
-
>> cd dataTools
-
>> addpath pwd
- cd to where the session is. E.g.:
>> cd(RAID);
>> cd projects\distance\trackhybrid\js031006 -
>> SetupSession
The code will take a few seconds to check your paths, then show you a set of the following four dialogs: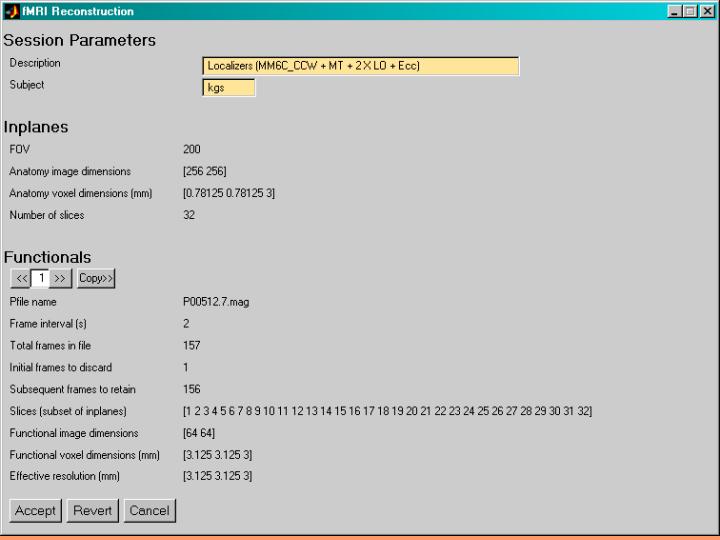
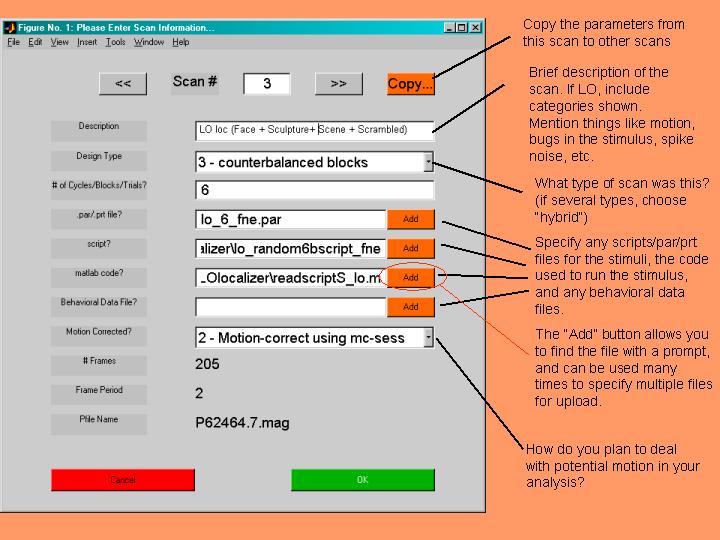

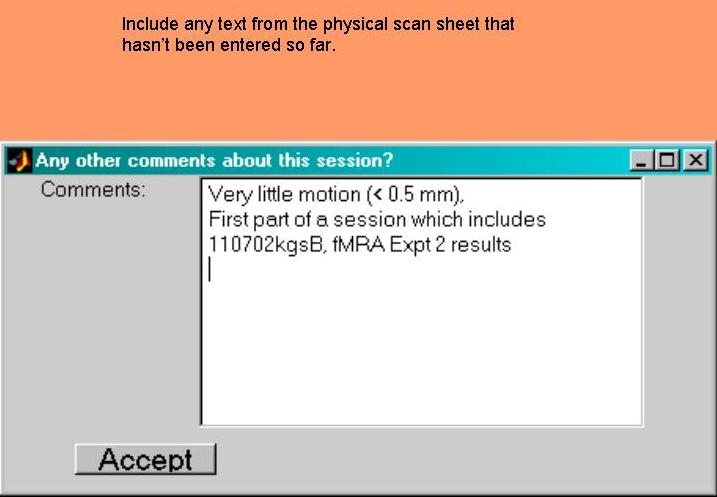
Fill out whatever is applicable in each of the dialogs. This will generate, among other things, a 'Readme.txt' file in the directory summarizing this session:

- The code will then try to upload all the information about this scan to the
database. First, it will try to log in to the mrData database. Enter the password
for vista, plus your username to log in.
Then, depending on how things are set up, it may ask you to clarify a few things--

--about the session. For instance, it may ask you to pick the subject from a list of subjects in the database, or choose what kind of display was used (most KGS sessions use the 3T front bore projector). Then it will give a bunch of text indicating upload progress. - You're done! Have a cigar.
Okay, but how do I actually look stuff up in the database?
That part's coming up. But you can check here to see the results of your diligent uploading work, and see what else is in the database.
Last modified 2004-Mar-23 05:28 GMT.